FreeBSD 4.0, 4.1, 4.2, 4.3
FreeBSD 4.0, 4.1, 4.2, 4.3
FreeBSD 4.0, 4.1, 4.2, 4.3
Support
This guest operating system is supported on the following VMware products:
| • |
|
VMware Workstation 4.0, 4.0.1, 4.0.2, 4.0.5, 4.5, 4.5.1, 4.5.2, 5.0, 5.5, 5.5.1, 5.5.2
Experimental support for 2-way Virtual SMP on Workstation 5.5, 5.5.1, 5.5.2 |
| • |
|
VMware ACE 1.0, 1.0.1, 1.0.2 |
| • |
|
VMware GSX Server 3.0, 3.1, 3.2, 3.2.1 |
| • |
|
VMware Server 1.0
Experimental support for 2-way Virtual SMP on VMware Server 1.0 |
Note: If you are installing a guest operating system through VMware VirtualCenter, be sure it is supported under the VMware product-ESX Server or GSX Server-on which you are running the virtual machine.
Note: With many Linux guest operating systems, various problems have been observed when the BusLogic virtual SCSI adapter is used with VMware virtual machines. VMware recommends that you use the LSI Logic virtual SCSI adapter with this guest operating system.
FreeBSD 4.0, 4.1, 4.2, 4.3
General Installation Notes
Be sure to read
General Guidelines for All VMware Products as well as this guide to installing your specific guest operating system.
The easiest method of installing FreeBSD 4.0, 4.1, 4.2 or 4.3 in a virtual machine is to use the standard FreeBSD distribution CD.
Before installing the operating system, be sure that you have already created and configured a new virtual machine.
FreeBSD 4.0, 4.1, 4.2, 4.3
Installation Steps
1 Insert the FreeBSD CD in the CD-ROM drive.
2 Power on the virtual machine to start installing FreeBSD.
3 Follow the installation steps as you would for a physical PC.
FreeBSD 4.0, 4.1, 4.2, 4.3
VMware Tools
Be sure to install VMware Tools in your guest operating system. For details, see the manual for your VMware product or follow the appropriate link in the knowledge base article at
www.vmware.com/support/kb/enduser/std_adp.php?p_faqid=340.
FreeBSD 4.0, 4.1, 4.2, 4.3
Known Issues
FreeBSD 4.0, 4.1, 4.2, 4.3
Setting the Disk Geometry for a FreeBSD SCSI Virtual Disk
If you install FreeBSD 4.0, 4.1, 4.2 or 4.3 as the guest operating system on a 2GB or larger SCSI virtual disk, the guest operating system does not boot unless you take the special steps described in this section.
It fails to boot because the virtual disk geometry is not probed correctly by FreeBSD when you install the guest operating system. FreeBSD installs the boot loader in the wrong location on the virtual disk. When FreeBSD tries to boot, the FreeBSD boot loader asks the BIOS for important data that is now on a different section of the virtual disk, so FreeBSD cannot boot.
This problem has been fixed in FreeBSD 4.4. This and later versions correctly boot SCSI virtual disks of any size.
To use FreeBSD 4.0, 4.1, 4.2 or 4.3 in your virtual machine, you can do one of two things:
| • |
|
Use an IDE virtual disk in your virtual machine. You might need to add the IDE virtual disk to the virtual machine with the Configuration Editor. |
| • |
|
Set the disk geometry by hand when installing FreeBSD. These steps are outlined below. |
To set the disk geometry manually, take these steps.
1 FreeBSD calculates an incorrect disk geometry before you arrive at the FDISK Partition Editor, as illustrated here.
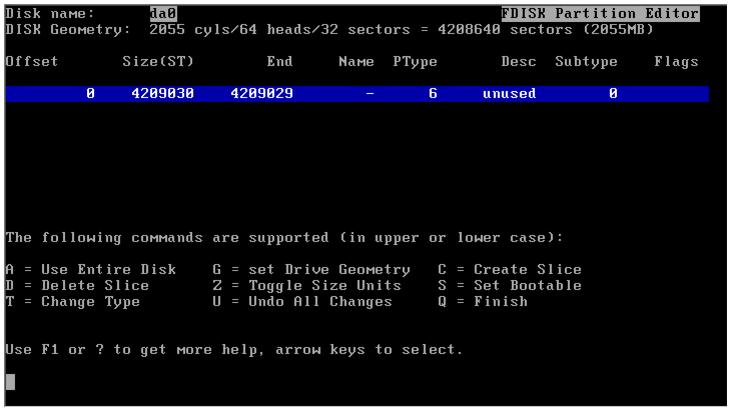
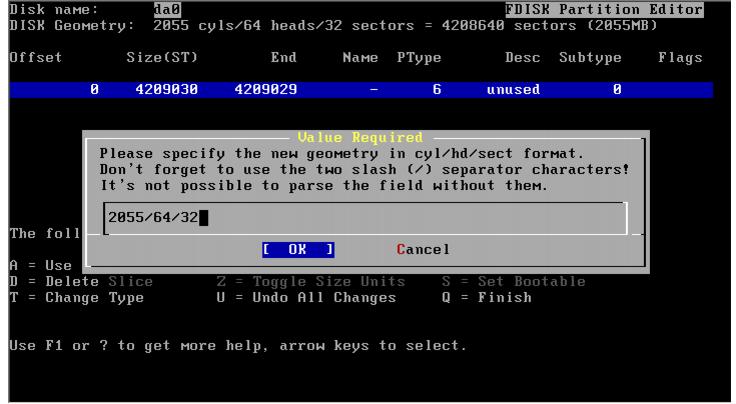
2 To set the disk geometry, press G to select the option Set Drive Geometry. A dialog box appears, containing numbers like 2055/64/32, representing the incorrect geometry in cylinders, heads and sectors per head.
3 To calculate the correct geometry, find the total number of sectors by multiplying the number of cylinders, heads and sectors per head together, and then dividing the number of sectors by the correct number of heads and sectors per head.
In the above illustration, the virtual disk is a 2055MB disk with 2055 cylinders, 64 heads and 32 sectors per head (these numbers represent the incorrect geometry). The product of these three numbers (2055 x 64 x 32) equals 4,208,640 sectors.
To determine the correct geometry for the BusLogic compatible virtual SCSI adapter used by the virtual machine, calculate the number of cylinders, which is 4,208,640 sectors divided by the product of the actual number of heads and sectors per head (255 heads times 63 sectors per head). This results in a total of 261 actual cylinders (4208640/(255 * 63) = 261, rounded down).
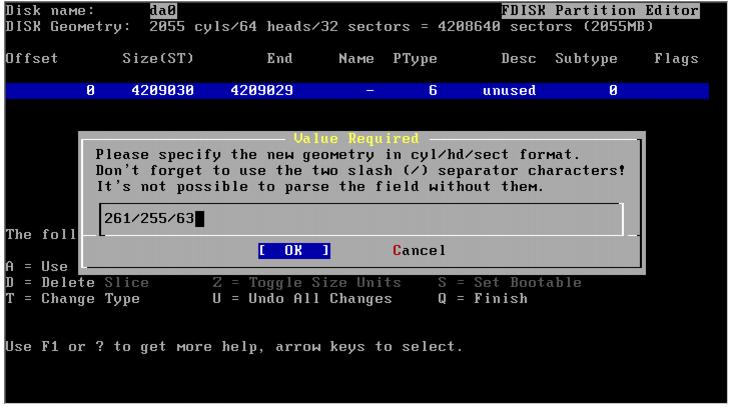
4 You can now enter the correct geometry of 261 cylinders, 255 heads and 63 sectors per head by typing 261/255/63 in the dialog box. Then click OK and continue installing FreeBSD.
FreeBSD 4.0, 4.1, 4.2, 4.3
Sound
VMware has not tested sound support in FreeBSD.
FreeBSD 4.0, 4.1, 4.2, 4.3
Guest Screen Saver
On a Linux host with an XFree86 3.x X server, it is best not to run a screen saver in the guest operating system. Guest screen savers that demand a lot of processing power can cause the X server on the host to freeze.