You are reading help file online using chmlib.com
|
You are reading help file online using chmlib.com
|

|
|
Top Previous Next |
|
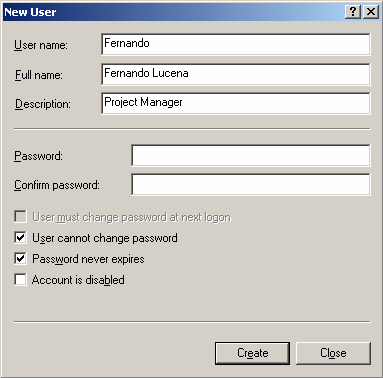
Shared Access to Folders over LAN for project managers. To get access to Projetex 2006 file storage you must create user account for every project manager on the computer where Projetex 2006 Server is installed first. There are several ways to create user accounts, but let us start simply by right-clicking on My Computer icon on the desktop and select Manage. Once the Computer Management window comes up, with the System tools > Local Users and Groups > Users item selected, right-click on right pane, select New User, fill User Name, Password and Confirm Password fields and click Create button. Other fields are optional.
Repeat until all needed user accounts are created. You may need to group project manager users together for administrative convenience. Settings that you make for a group is automatically applied to all users in the group, so you do not need to make the same settings individually for each user. There are a couple of ways to create user accounts. For example, right-click on My Computer icon on the desktop, and select Manage. Once the Computer Management window comes up, with the System Tools > Local Users and Groups > Groups item selected, right-click in right pane, give the new group a name and description. Click Add to add users to the new group. In the Select Users window, set the Object Type to Users and click OK. The Location should show the name of your computer. Click Advanced and then click Find Now to see a list of user accounts. Select users which you want to be members of the new group. You can make multiple selections by holding down <Ctrl>- and clicking. Click OK twice. Click Create to create the new group.
Having created user accounts for project managers and a group to join all these user accounts you need to specify folder sharing. To specify sharing options right-click Business folder and select Sharing and Security. On the Sharing tab, select Share this folder and enter a share name BUSINESS. Add a comment if desired. This comment describes the share and is visible for the other computers in My Network Places. For security reasons it is recommended you to delete Everyone group from the Permissions, add to Permissions group PM and allow full control for it in the system, where Projetex 2006 Server is installed.
Shared Access to Folders over LAN for Corporate Experts For each corporate expert you should create user account on computer where Projetex 2006 Server is installed. This procedure is the same as for project managers. Creation of a new group for corporate experts is not necessary. Open corporate experts' folder (by default it is C:\Business\Experts\Corporate) and select separate Expert folder. To specify sharing options right-click the folder and select Sharing and Security. On the Sharing tab, select Share this folder and enter a share name (it should be same as the folder name). Add a comment if desired. This comment describes the share and appears on other computers from My Network Places. Delete Everyone group from Permissions, add to Permissions user account for the necessary Corporate Expert and allow full control for it. Repeat these steps for each corporate expert's folder you need. To be able to access shared folders from Projetex 2006 2006 Workstation you need be authorized for these folders. I.e. you need to open these folders in My Network Places. There is no need to authorize project manager for every corporate expert's folder. Once they are authorized for Business folder they already have access to all its subfolders.
See Also: |
You are reading help file online using chmlib.com
|